for easier reading download pdf FSA_campaign06Jan15
2015 Northman Gaming Club Firestorm Armada Campaign
Based on the “The Man Battlestations Firestorm Armada Campaign System”
1. Introduction. The Firestorm universe is one fraught with peril, as massive fleets belonging to the
major powers of the Zenian League and Kurak Alliance wage deadly battle back and forth across
the Storm Zone in an epic war of annihilation that will shape the future of this quadrant of the
galaxy. And if this wasn’t enough, countless other factions are joining the fray for reasons of their
own; some are mere criminals, pirates and marauders who are motivated by greed. Others are
ideologues and fanatics, who see this war as a golden opportunity to influence events and
remake the galaxy to their liking. Whatever their cause, the net effect is that the regions
surrounding the Storm Zone are being plunged ever further into chaos.
This campaign system is designed to allow a group of players to play a campaign that tells its own
story inside the exciting Firestorm setting. Inside, you will find rules that allow you to create
legendary commanders, renowned vessels of war, and a series of scenarios that will enable you to
wage war and carve out your own empire!
2. New Concepts. The MBS Campaign System introduces a few new concepts that are not found in
the Firestorm Armada rulebook:
Renown – This is a measure of the level of esteem with which your commander character is
viewed by their respective High Command. Renown can be gained or lost depending on your
battle performance. The higher your renown, the more resources and reinforcements a player
will be able to obtain. At the end of the campaign, the commander with the highest Renown
wins!
Proficiency – This is a measure of how skilled a vessel’s crew is in combat, normally abbreviated
as “Pf”. All models medium sized and above are given a proficiency rating; for small ships, a
single proficiency rating is given to the entire squadron. The higher a ship or squadron’s
proficiency rating, the better it will perform in battle. These ratings can range between a
minimum of 5, indicating a Green crew, all the way to a maximum of 10, indicating a Veteran
ship that has seen much action and whose crew functions like a well-oiled machine (perhaps
literally in some cases!).
Re-rolls – Many famous commanders possess an “X-factor.” This might be the seemingly
miraculous ability to make the right decision in chaotic situation, or perhaps a charismatic
leadership style that inspires their crews to amazing feats of arms. To represent this, your
Commander will be granted a number of re-rolls, depending on their rank. A re-roll is exactly
what it sounds like; you pick up all the dice that you have just rolled for any check or attack, and
re-roll them. However, if you execute a re-roll, the second roll stands. Additionally, in the case of
attacks, the re-roll can only apply to the initial dice roll, before any additional dice gained from
exploding 6’s are rolled. The re-roll does NOT apply to those additional D6’s. Re-rolls can only be
used in the Fight! step of a campaign activation. A commander’s re-rolls can only be used once
per game; following the game, they “re-charge” and are available again.Page 2 7-Jan-15
3. Campaign Set-up
a. Faction Selection. At least two players are required to start the campaign; one player
must belong to the Kurak Alliance (KA), and the other to the Zenian League (ZL). Each
player should choose one of the 3 Major Factions for their respective side, i.e. the
Terrans, Sorylians, or Aquans for the KA and the Dindrenzi, Relthoza, or Directorate
for the ZL. Any number of additional players can join in, either fielding one of the 6
Major Factions or one of the smaller Alliance or Marauder factions.
b. Fleet Roster Creation. Each player now creates their starting fleet roster. The Major
Faction players will build their rosters using the Battle Fleet construction list from their
respective fleet guides. It is recommended that each Major Faction player start with at
least 1,000 points worth of models. Minor Factions and Marauder Factions will create
Patrol Fleet lists using their respective faction guides. Each model in the starting roster
must be taken “as-is,” with no hard point modifications or upgrades installed. These
modifications and upgrades will become available as the campaign progresses and
ships are fitted with new technology being raced to the front line! Each model and
squadron will need a name and will have a separate entry on the roster for tracking
the ship’s proficiency, damage, crew status, upgrades, etc. This should be done on this
campaign’s fleet roster spreadsheet (found on the Event page of NGC Facebook) and
updated after each battle. An analog version is also provided as Appendix A.
Once the fleet’s composition is decided, players will need to determine the starting
Proficiency (Pf) level of each ship in their fleet. These values might well vary across a
fleet, representing the fact that various ships have been pulled from different
sectors and might have differing levels of experience, better or worse officers, etc.
To find a ship’s starting proficiency roll 1D6, consult the table below, and note the
resultant proficiency level on the roster entry for the ship:
D6 Roll Proficiency Level
1* Untried (Pf 6)
2-3 Battle-Tested (Pf 7)
4-5 Battle-Hardened (Pf 8)
6 Veteran (Pf 9)
* fully painted squadrons re-roll 1s—fully equipped squadrons would not be Untried.
Note that it is not possible to achieve Crack (Pf 10) status at the start of the
campaign. No matter how experienced a ship is, it will be new to this theater of war,
and that will cause at least some consternation with the crew as they adapt to their
surroundings. Likewise, no ship will start at the bottom level of Green (Pf 5); no
matter how desperate the war has gotten, a high command isn’t going to send a ship
that poorly trained to the front lines!
Page 3 7-Jan-15
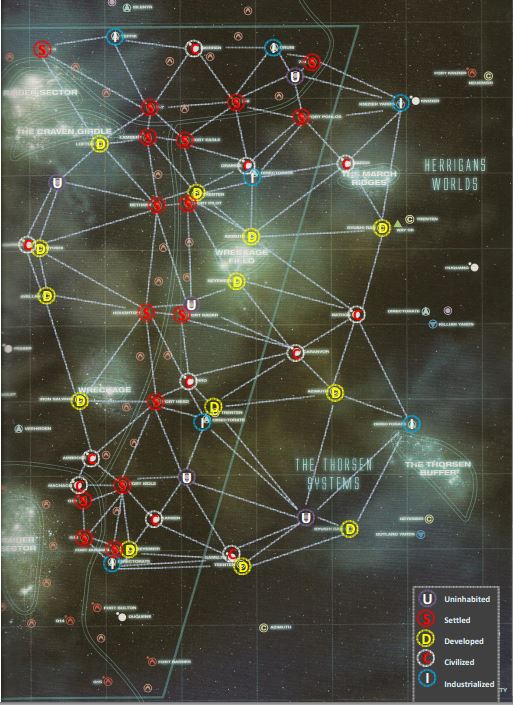
c. Map & Home System Selection. The next step is to consult the campaign map for the
sector of the Storm Zone you will be fighting in (see attached). The campaign’s system
map will be appended to this document. This map will be used to keep track of the
systems controlled by the players as the campaign progresses. Once the map has been
chosen, each of the Major Faction players will need to select their starting systems
from those available on the map, up to a total of three starting systems. Starting with
the fleet with the lowest points total picks one system first, then, the next lowest picks
second, etc. (this order represents smaller fleets being more “nimble” and moving
quicker/sooner than the larger fleets).
Second system picking then occurs in reverse order (largest fleet first). All selected
systems by a player must have no more than one neutral system between their starting
systems.
Third system picking then occurs again starting with the lowest point fleets.
Minor powers select their home systems in the same way after all Major Factions have
chosen their home systems.
Marauder Factions go last, and select their home systems are secret. This represents
their hidden Pirate lair!
d. The Commander. Each player’s fleet has a commander that represents the player on the
table. Over the course of the campaign, the commander will collect renown points and
receive promotions as a result. At the end of the campaign, the commander with the
highest renown is the winner! Once your fleet roster is in order, you will “assign” your
commander by giving him or her a name and recording their starting Renown value of
“1.” You track this on Fleet Commander Service Jacket which is included as part of your
Fleet Roster in the campaign’s spreadsheet An analog version is also provided as
Appendix A. . The commander must also be assigned to a specific ship that will serve as
that officer’s flag ship. For this purpose, not any ship will do. You must select a Medium
or Large Capital class ship. Non-capital ships lack the proper command and control
facilities that your fleet commander will require to effectively lead your force, to say
nothing of their lack of grandeur! If the commander’s flagship is present at a battle, then
“you” are there, and are able to make use of any special commander abilities. If the
flagship is not taking part in a battle, then the commander’s abilities will be unavailable.
If the flagship is Lost, it is assumed that the commander manages to escape. They can do
no more to influence that battle, but you may assign them to a new flagship once the
game is over.
Page 4 7-Jan-15
4. Fighting the Campaign
a. Phases. Each Campaign Turn consists of two phases, as described below:
i. Strategic Phase
ii. Operational Phase
b. Strategic Phase. During the strategic phase, the initiative order for that Campaign Turn
will be determined by the lowest current points total picks first, then, the next lowest
picks second, etc. Ties will be resolved by highest Renown choosing first.
Example: Four players have total fleet values of 870, 910, 910, and 1100pts. The player
with 870pt fleet will go first in the Operational Phase. The two players with fleet value of
910 will compare Renown (one had Renown of 4, the other 6) with the highest Renown
going first. These two players will then go 3rd and 2nd, respectively. The player with a
fleet of 1100 on the goes 4th
.
c. Operational Phase. During the operational phase, each player activates in sequence and
completes a Campaign Activation. A Campaign Activation is divided into the following
steps:
i. Select Systems To Attack. Players can select up to two systems to attack per
turn1
. The player can only attack a system that is connected to one they
already control by a Fold Space Channel. If the system is Neutral, the player
may challenge any player in the campaign. Otherwise, they will be fighting the
player that already controls the system.
ii. Determine Orders. Roll 1D6 and consult the table below:
1D6 Roll Orders
1-2 Raid (350-500 pts)
4-6 Battle (500-1000 pts)
If the player whose activation it is has 21 or more Renown, then they may choose
to play either a Raid or Battle instead of rolling on the chart.
iii. Decide Scenario. Roll 1D6 to select one of the scenarios from the FA rulebook.
The player whose activation it is will always be the Attacker for scenario
purposes. If both players agree, a scenario can be chosen from the list in the
book instead of rolled for. Additionally, feel free to substitute your own
scenarios!
iv. Determine Size of Game. Once the scenario has been chosen, the two players
involved agree on the point limit for the game, within the limits of the Orders
table. If one player holds more systems than the other player, their forces will
be spread more thinly. This gives the player with fewer systems an advantage.
Thus, the player with more systems must reduce the size of their fleet by 10
points for every additional system held over his opponent.
1
Players can have “bonus” games each turn beyond those define in the Operations Phase. These are ad hoc or
pick-up games that can add to the players’ Renown. All bonus games are Raids, but confer all of the campaign
benefits of a normal Raid order. Page 5 7-Jan-15
v. Pick Fleets. Players now choose forces from their fleet roster to play the game.
These fleets are still subject to the fleet composition rules found in the applicable
faction guide. Note that players can take reduced-size squadrons in order to
reduce the number of fleet points to meet the game size restrictions. This may
mean taking less than full squadrons in some instances.
vi. Fight! The two players now play the selected scenario with the fleets they have
chosen from their rosters. The victory conditions are in accordance with the
scenario rules listed in the rule book.
vii. Aftermath. Once the game is over, a series of steps must be completed to
determine how the outcome has affected the course of the campaign. The
Aftermath should be conducted immediately after the battle and the
opponents should observe each other’s Aftermath. These steps are:
1. Spoils of War
a. Whenever an attacker wins a battle, that player claims control
of the system. If an attacker wins a raid, the raided system
counts as being under that player’s control for the rest of that
Campaign Activation. That means the system’s resources will be
available for the attacker’s use during the Repair Step, as
described below.
2. Narrow Escape Checks
a. When a ship is reduced to 0 HP, it is considered lost for the
purposes of that game. However, this does not mean that a ship
has been destroyed. It is possible that it has taken such heavy
punishment that all of its major systems and power plants have
been knocked off-line, making it all but invisible to most sensors
at common combat ranges. A crafty crew will bide their time
until the battle has subsided, then make emergency repairs and
escape. It is not uncommon for heavily damaged ships to limp
back to a friendly base days or even weeks after they were
presumed “lost” in battle!
Therefore, any destroyed Medium-sized or larger ship may
make a Narrow Escape roll following the game. On a 4+, the
ship actually survives the battle, and is returned to a player’s
roster with 1 HP and 1 CP. Ships that make a successful Narrow
Escape check do not count as Lost for the purposes of Renown
adjustment. Ships that were lost due to Reactor Overloads,
Collisions, or being captured in a Boarding Action cannot make
Narrow Escape checks; the enemy is not going to politely hand
their prizes back to their enemies, and ships that blow up tend
to stay blown up! Likewise, Small models cannot make
NarrowEscape rolls since ships that small simply do not have
the ability to take the punishment a larger vessel can.
Page 6 7-Jan-15
3. Adjust Renown
a. As discussed earlier, Renown is a measure of the fame or infamy
enjoyed by a player’s commander. A commander starts with a
Renown score of 1, and gains or loses additional points of
Renown per the table below (this table assumes you are using
the Battle Log in your games to determine Margin of Victory).
In this step, both the Attacker and Defender adjust their
commander’s Renown. A commander’s renown score is
extremely important, as it will decide the winner at the end of
the campaign. Note that you gain or lose renown regardless if
the commander’s flagship took part in the battle. Also note that
you can never have less than 1 Renown point; you may be
renowned as a bad commander, but you will be renowned
nonetheless!
RENOWN TABLE
Winning a Landslide Victory +3
Winning a Major Triumph +2
Winning a Marginal Success +1
Each Capital Class model captured +1
Fought Commander With Higher
Renown
+1
Fought Fleet with higher points value
and Lost
+1
Fought Fleet with higher points value
and won
+2
Fleet Painted Bonus2
+1
“Blitzkrieg Bonus” Game completed in
under 2.5 hrs (time starts from start of
deployment)
+1
Losing a Battle or Raid -1
Each Large Capital Class model lost -1
Results of the battle, including the renowned adjustment should be posted in the campaign’s online form. It is
recommended that photographic evidence of the battle is posted on the Facebook event page.
2
Fleet Painting Bonus will escalate each monthly Campaign Turn as follows:
Turn 1 – at minimum, all models in battle are assembled and primed
Turn 2 – all models in battle are primed and at least 1 squadron is painted
Turn 3 – all models in battle are primed and at least 2 squadrons are painted
Turn 4 – all models in battle are primed and at least 3 squadrons are painted
Turn 5 – all models in battle are primed and at least 4 squadrons are painted
Turn 6 – all models in battle are painted or at least 5 squadrons are painted
Definition of “Painted” = at least three colours plus either highlighted or shaded/washed. Page 7 7-Jan-15
Renown Perks
1-5 • 1 Re-Roll
6-10 • 2 Re-Rolls
11-20 • 2 Re-Rolls
• Free “Intel Gained” TAC
21-30 • 3 Re-Rolls
• Free “Intel Gained” TAC
31-50 • 3 Re-Rolls
• Free “Intel Gained” TAC
• Flagship gains “Special Forces” MAR
51+ • 4 Re-Rolls
• Free “Intel Gained” TAC
• Flagship gains “Special Forces” MAR
4. Promotions & Demotions
a. Your commander will receive promotions according to their
renown as shown on the tables below. It is also possible to be
demoted to the next lower rank if you lose too much renown
and no longer qualify for your lofty title! The higher a
commander’s rank, the more perks and Fleet Re-rolls they
will be granted. These perks represent your commander’s
improving abilities, the growth of a personal espionage
network, or even the assignment of an elite body guard to
keep their lofty personage safe!
Along with these benefits, your commander will also gain
titles to go along with their rank, depending on their faction:
Kurak Alliance Titles
Renown Terran Sorylian Aquan
1-5 Captain Master Scout Spawn Guardian
6-10 Commodore Sky Hunter Shoal Guardian
11-20 Rear Admiral Master Sky Hunter Shoal Protector
21-30 Vice Admiral Sky Predator Guardian of the Sebrutan
31-50 Fleet Admiral Master Predator Protector of the Sebrutan
51+ Star Admiral Warlord Grand Admiral of the Sebrutan
Zenian League Titles
Renown Dindrenzi Directorate Relthoza
1-5 Lieutenant-Captain Associate Fleet
Manager
Brood Leader
6-10 Captain Fleet Manager Brood Master
11-20 Senior Captain General Fleet Manager Swarm Leader
21-30 Admiral Deputy Director, Fleet
Operations
Swarm Master
31-50 General Admiral Director, Fleet
Operations
Hive Leader
51+ Grand Admiral Vice President of Fleet
Operations
Hive Master Page 8 7-Jan-15
5. Ship Experience. As the campaign progresses, the crew of veteran ships
will gradually learn what it takes to survive in battle. As their teamwork
improves and confidence grows, these experienced crews will become
more and more effective; this is represented by increasing their
Proficiency characteristic. However, ships that take heavy crew losses
will end up losing some of their finely honed edge, as they absorb large
numbers of new replacements to round out their decimated crews.
a. Gaining Experience: Roll 2D6 for each Medium and larger ship
that fought in the battle and was not destroyed. If the roll is
higher than that ship’s current Pf rating, then its Pf rating is
increased by 1.
b. Narrow Escapes: Even a successful Narrow Escape is hard on a
ship and crew; any vessel that passes a Narrow Escape check
also suffers -1 to its Pf rating, to a minimum of 5.
c. Small Class Vessels: Squadrons of small class vessels gain and
lose Pf in a similar manner to their larger brethren; in their case,
the Pf rating applies to the entire squadron, instead of each
individual ship.
d. Proficiency Perks: A crew’s Pf level confers certain advantages
and disadvantages. At the low end, a crew may find it hard to
survive the same adversity a veteran crew can. On the high end,
crack crews gain the benefit of MARs that represent the hardwon
experience of their many battles. Crews gain certain perks
based on their Pf level per the table below:
Pf Level Perks
Untried (Pf 6) Model suffers -1 to its D6 rolls for Narrow
Escape checks
Battle-Tested (Pf 7) No Bonus
Battle-Hardened (Pf 8) Model Gains “Experienced Engineers” MAR
Veteran (Pf 9) Model Gains “Experienced Engineers” and
“Elite Crew” MARs
Crack (Pf 10) Model Gains “Experienced Engineers” and
“Elite Crew” MARs, and +1 to its D6 rolls for
Narrow Escape checks. Page 9 7-Jan-15
6. Repairs & Withdrawals. In a campaign, ships that have suffered damage
must be repaired, and lost crew must be replaced. The number of
systems a player controls determines just how much damage can be
fixed and how many new spacers can be recruited to replace lost crew.
It is entirely possible that your fledgling empire will not generate
enough resources to repair all the damage and crew loss your fleet has
suffered. In that case, you can let such undermanned and damaged
ships limp on until such time they can be repaired, or they can be sent
back to a rear area for repair at a major fleet base.
a. Repairs: A player repairs HP and CP damage from a pool of
points generated by the planets they control. Each type of
planet generates a different number of CP and HP per turn;
these values also vary with a Commander’s Renown. Renown is
important because it helps with recruiting/press-ganging new
crew, claiming resources and dockyard space, etc. Note that all
Critical Effects are repaired automatically after a battle. Also
remember that if the attacker won a raid he may count the
system where the raid took place as his own for this activation.
You can also use HP and CP repair points to restore Small ship
squadrons to full strength; each ship costs its HP and CP value
to replace. To determine your commander’s HP and CP pool,
look up the numbers for each planet you control for your
commander’s current Renown using the table below. Note that
any CP or HP not used during a player’s activation is lost; you
cannot “bank” CP and HP from turn to turn!
Renown Uninhabited Settled Developed Civilized Industrialized
1-5 1 HP/0 CP 1 HP/1 CP 1 HP/0 CP 1 HP/2 CP 4 HP/1 CP
6-10 1 HP/0 CP 1 HP/1 CP 1 HP/0 CP 2 HP/2 CP 4 HP/2 CP
11-20 1 HP/0 CP 1 HP/1 CP 1 HP/0 CP 3 HP/3 CP 5 HP/2 CP
21-30 1 HP/0 CP 2 HP/2 CP 1 HP/0 CP 4 HP/4 CP 6 HP/3 CP
31-50 1 HP/0 CP 2 HP/2 CP 1 HP/0 CP 5 HP/6 CP 8 HP/3 CP
51+ 1 HP/0 CP 3 HP/2 CP 1 HP/0 CP 6 HP/8 CP 10 HP/4 CP
b. Withdrawing Ships: A player may choose to withdraw ships to
get them fully repaired at a major base. Mark the fact they have
been withdrawn on the fleet register. Ships which are
withdrawn are unavailable until the beginning of the player’s
next Strategic Phase, at which they return to the fleet with full
HP and CP. Squadrons of Small models return at full health and
their starting number of ships. If, for any reason, a ship is
reduced to Pf 5, it is automatically withdrawn, having been
deemed as combat-ineffective due to the poor quality of its
crew. Ships withdrawn for this reason will return with full HP,
CP, and Pf 6.Page 10 7-Jan-15
7. Appeals. After repairs have been completed, the player whose
Campaign Activation it is can appeal to higher headquarters for
additional aid. This aid could take the form of badly needed
reinforcements, or the latest technologies with which to upgrade your
existing fleet. A Commander with high Renown will wield great
influence and be able to demand a greater share of resources from
their faction’s war effort. To reflect this, the number of appeals that
may be made depends on the player’s Renown as shown in the table
below:
Renown Number of Appeals
1-10 1
11-30 2
31-50 3
51+ 4
Appeals may be made for Reinforcements or Refits. If you are allowed
to make more than one appeal, you can ask for the same thing up to
two times. In order to determine if the appeal is successful, roll 1D6 for
each attempt. Reinforcement Appeals are successful on a 2+, while Refit
Appeals are successful on a 4+. You must declare the type of appeal you
are trying for before rolling.
a. Reinforcements. If the appeal is granted, one new
squadron may be added to the player’s fleet registry.
Note that the models of this squadron can be of any
size, small through massive. If the squadron consists of
more than one ship, you can have as many ships in the
squadron as you have models to represent, up to the
maximum allowed squadron size. The Pf rating for this
squadron is determined randomly using the same table
from the Campaign Set-up rules.
b. Refits. If the appeal is granted, select one squadron,
and select one of the Hardpoint or Upgrade selection
for that squadron. That squadron now counts as having
that Upgrade or Hardpoint, and its cost rises by the
amount listed in the applicable fleet guide. These
hardpoint installs and upgrades are permanent,
meaning that the model’s cost permanently increases
too! This appeal cannot be applied to a model that
already has all of its upgrades and all of its hard points
filled.